The SB (Squawkbox) program is used to connect a Flight Simulator to the internet. It talks with Microsoft Flight Simulator using the FSUIPC program and the multiplayer features. You need FSUIPC installed so SB can access and modify variables not available in usual multiplayer communications like weather. It uses the multiplayer capabilities to allow FS to show you other players in your area. SB talks to a network of servers that other players also connect to. These servers typically have other players using a program like ProController which allows the players using it to view location of other players and guide them as an ATC (Air Traffic Controller). I have never been able to find documentation to show how to use the many different features of SB so this document attempts to show what I have learned through my many hours of using it.
 The first thing you see once getting past the
splash screen of SB is the message area. You will need to stretch and
shrink the display till it appears where
and how you would like it. You can type messages and commands into the
white
area and read the responses in the black area. In this example the
green text is being sent by another aircraft
and the red is what I have sent. I have my Flight Simulator set up to
allow the responses to scroll across the top of the FS screen also. You
can see here an “IDENT” button. When you are online
you can click this button to momentarily allow your aircraft symbol to
flash on
the ATC’s screen. When they ask you to
“IDENT” they want you to click this button. The
“F” and “E” buttons bring up
the FMS and the TCAS.
The first thing you see once getting past the
splash screen of SB is the message area. You will need to stretch and
shrink the display till it appears where
and how you would like it. You can type messages and commands into the
white
area and read the responses in the black area. In this example the
green text is being sent by another aircraft
and the red is what I have sent. I have my Flight Simulator set up to
allow the responses to scroll across the top of the FS screen also. You
can see here an “IDENT” button. When you are online
you can click this button to momentarily allow your aircraft symbol to
flash on
the ATC’s screen. When they ask you to
“IDENT” they want you to click this button. The
“F” and “E” buttons bring up
the FMS and the TCAS.
TCAS
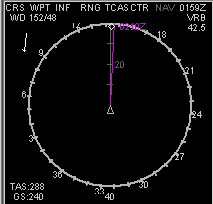 The
TCAS display shown here should be what you see when clicking the
“E”
button. It shows your direction, wind direction (upper left), air and
ground speed (bottom left), course, waypoints, navigation aids, and
other aircraft around yours in their relative
positions. You can zoom the range in or out by clicking or right
clicking in the center of this area. In the upper right is the current
time in Zulu (GMT) with your next waypoint and distance to that
waypoint. The words along the top are active. They can be clicked to
turn different options for this display off or on.
The
TCAS display shown here should be what you see when clicking the
“E”
button. It shows your direction, wind direction (upper left), air and
ground speed (bottom left), course, waypoints, navigation aids, and
other aircraft around yours in their relative
positions. You can zoom the range in or out by clicking or right
clicking in the center of this area. In the upper right is the current
time in Zulu (GMT) with your next waypoint and distance to that
waypoint. The words along the top are active. They can be clicked to
turn different options for this display off or on.
CRS causes your course to be displayed. Shown here in purple.
WPT causes your way points to be displayed as diamonds.
INF causes information to be displayed about nearby navigational aids. The first click shows them, the second click shows their names, a third click shows the time you are expected to arrive at the waypoint (in zulu) and a fourth click turns them off again.
RNG causes the ring to be displayed. The numbers around the ring are the directions of the compass.
TCAS when on will show yellow and red warnings when an aircraft is getting too close to yours. At times you will even get audible warnings “TCAS Alert!” but I haven’t quite figured out what sequence of options turns it on but it can be turned off by clicking the letters TCAS.
CTR causes the aircraft symbol to be centered in the ring. Otherwise the aircraft is shown near the bottom of the display and only a portion of the ring is displayed.
NAV (grayed out here) when clicked show symbols for nearby VOR and NDB stations. Another click on this and the navigation names will appear. A third click will cause their frequencies to appear. A fourth click turns them off again.
FMS
The FMS is the meat of SB. Some would disagree and say SB is mostly used to communicate with other players. In my mind Roger Wilco has taken over the role of communication in these days of broadband. There are lots of buttons by and around the main FMS display as shown here.
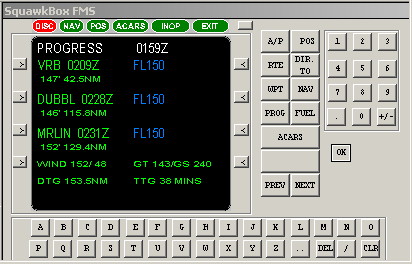 The
colored
buttons on the top are duplicated
on the side. There is a little unlabeled button to the right of the
“EXIT” button. This shrinks the FMS to just the
text display and it’s surrounding buttons. If all your
important buttons disappear press that unlabeled button again to bring
them
back. Once again you need to stretch and shrink the window to move it
to the proper position and size. SB will remember all of the window
information so you only have to
go through the stretch and shrink till you find a favorite setup. The
letter and number pads are used to enter information. The information
appears at
the bottom of the text screen until you hit the button to use it. This
display here is the NAV display. It shows the next 4 waypoints, the
direction
to each waypoint from your current position and the distance along the
flight
path to that waypoint. If you pass the top waypoint and are on your way
to the second one you may notice that the distance keeps getting
farther. That is
because SB is computing the distance as if you were flying back to the
top
waypoint then on to the 2nd waypoint. You have
to manually delete the top waypoint in the WAY screen for this screen
to show properly. You see here an FL listed. My flight plan
includes flight levels so they show up here. If I was approaching a
point in a STAR the flight levels would be different. Most of the time
you can scroll down the waypoints by clicking the NEXT button.
The
colored
buttons on the top are duplicated
on the side. There is a little unlabeled button to the right of the
“EXIT” button. This shrinks the FMS to just the
text display and it’s surrounding buttons. If all your
important buttons disappear press that unlabeled button again to bring
them
back. Once again you need to stretch and shrink the window to move it
to the proper position and size. SB will remember all of the window
information so you only have to
go through the stretch and shrink till you find a favorite setup. The
letter and number pads are used to enter information. The information
appears at
the bottom of the text screen until you hit the button to use it. This
display here is the NAV display. It shows the next 4 waypoints, the
direction
to each waypoint from your current position and the distance along the
flight
path to that waypoint. If you pass the top waypoint and are on your way
to the second one you may notice that the distance keeps getting
farther. That is
because SB is computing the distance as if you were flying back to the
top
waypoint then on to the 2nd waypoint. You have
to manually delete the top waypoint in the WAY screen for this screen
to show properly. You see here an FL listed. My flight plan
includes flight levels so they show up here. If I was approaching a
point in a STAR the flight levels would be different. Most of the time
you can scroll down the waypoints by clicking the NEXT button.
A/P button connects this FMS to your autopilot. SB will program your autopilot to take you to each succeeding waypoint and remove the waypoints from the list as they are passed. Personally I see very few reasons to have to use this feature. VATSIM, the service I use, discourages you from logging on and leaving the computer for extended periods of time. The reason I use Squawkbox is to fly an aircraft in Flight Simulator 2002. I don't use SB to watch it fly the plane for me. If I was on a "Cross the Pond" flight and needed to visit that little room just outside the cockpit or go to the galley to get some nourishment I will make limited use of this feature.
POS shows a display of the coordinates of where you are along with direction and speed. This comes in handy when trying to find a non-unique nearby intersection. If you try to use the DIR-TO intersection and it lists 2-4 different possibilities you need to know which one is closer to you.
RTE allows you to manually program the flight plan. You enter the starting point and destination. I never use this because I download my flight plans from www.simatc.com or create them using FSBuild.
DIR. TO
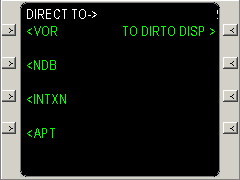 Click
the DIR. TO button and you get this display. It wants you to key in a
navigation aid. If you have already used this once during this session
you can
return to your previously selected display by pressing the little arrow
button
next to “TO DIRTO DISP”. Use the letter and number
buttons to key in a navigation aid and click the appropriate arrow
button. Want to find a specific airport
like Orlando International then hit the KMCO buttons, KMCO will appear
at the
bottom below APT. Press the arrow button next to the APT and you will
have directions to Orlando International. Want to find out about the
Vero Beach FL VOR
key VRB and press the arrow button next to VOR.
Click
the DIR. TO button and you get this display. It wants you to key in a
navigation aid. If you have already used this once during this session
you can
return to your previously selected display by pressing the little arrow
button
next to “TO DIRTO DISP”. Use the letter and number
buttons to key in a navigation aid and click the appropriate arrow
button. Want to find a specific airport
like Orlando International then hit the KMCO buttons, KMCO will appear
at the
bottom below APT. Press the arrow button next to the APT and you will
have directions to Orlando International. Want to find out about the
Vero Beach FL VOR
key VRB and press the arrow button next to VOR.
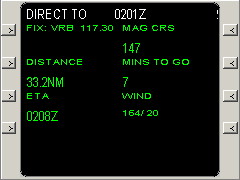 This shows the information for the Vero Beach VOR. Upper left shows the
frequency of the VOR. You can tune your nav radio to that frequency to
get a fix on
it. Upper right shows the magnetic direction you have to fly to get
there. Below the frequency is the distance in nautical miles. Assuming
you were to continue your current
speed it shows you the minutes it will take to get there. Finally it
shows the
time you will be there in GMT/Zulu and the current wind direction and
speed.
This shows the information for the Vero Beach VOR. Upper left shows the
frequency of the VOR. You can tune your nav radio to that frequency to
get a fix on
it. Upper right shows the magnetic direction you have to fly to get
there. Below the frequency is the distance in nautical miles. Assuming
you were to continue your current
speed it shows you the minutes it will take to get there. Finally it
shows the
time you will be there in GMT/Zulu and the current wind direction and
speed.
WPT
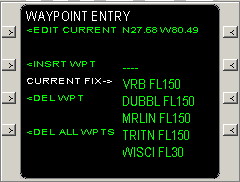 Waypoints are
points in your scheduled flight path. The list of waypoints can be
moved up and down past the “Current Fix” by
pressing the PREV and NEXT buttons. Once you pass a waypoint this
display must be used to remove that waypoint from the
list. If ATC tells you to expect vectors to an intersection or VOR then
proceed from there you can use this display to add that to your list of
waypoints. If your flight plan doesn’t have any STAR
waypoints and you have charts showing them you can add the
STAR’s waypoints to your flight plan. If your flight plan has
you going to LON instead of LOZ on your approach to KSDF you can easily
correct it by deleting the LON waypoint and adding the LOZ. If
ATC tells you that you can proceed to a waypoint down the STAR you can
delete
each entry before that waypoint.
Waypoints are
points in your scheduled flight path. The list of waypoints can be
moved up and down past the “Current Fix” by
pressing the PREV and NEXT buttons. Once you pass a waypoint this
display must be used to remove that waypoint from the
list. If ATC tells you to expect vectors to an intersection or VOR then
proceed from there you can use this display to add that to your list of
waypoints. If your flight plan doesn’t have any STAR
waypoints and you have charts showing them you can add the
STAR’s waypoints to your flight plan. If your flight plan has
you going to LON instead of LOZ on your approach to KSDF you can easily
correct it by deleting the LON waypoint and adding the LOZ. If
ATC tells you that you can proceed to a waypoint down the STAR you can
delete
each entry before that waypoint.
INSRT WPT – Allows you to insert a waypoint after the “Current Fix”. Entry is similar to DIR TO entry. Press the arrow button next to INSRT WPT. Using the letter and number buttons to key in a waypoint navigation aid or intersection and press the appropriate arrow button.
DEL WPT – Press this arrow button to delete the “current fix” from the list.
DEL ALL WPTS – Careful you don’t press this by accident. It removes all the waypoints in the list.
FUEL
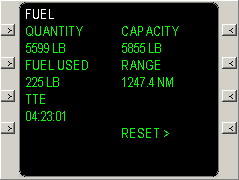 The
FUEL
display gives you a digital readout of how much fuel you have, how much
your tanks could hold, how much you have used since starting SB, how
far you can go in miles (assuming current speed) and time (assuming
constant usage). You can press the arrow button next to RESET to clear
the “Fuel Used” quantity.
The
FUEL
display gives you a digital readout of how much fuel you have, how much
your tanks could hold, how much you have used since starting SB, how
far you can go in miles (assuming current speed) and time (assuming
constant usage). You can press the arrow button next to RESET to clear
the “Fuel Used” quantity.
ACARS
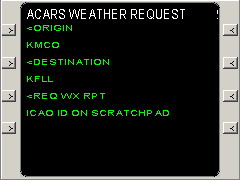 The
ACARS
button brings up this display where you can request a weather report.
Your official origin and destination are preset and the weather can be
brought up at the click of a single arrow button. If you want the
weather for an alternate landing site you can enter the ICAO code of
the airport using the letter and number buttons and click the arrow
button next to REQ WX RPT. The weather report is in the
form of a METAR. A typical metar looks like the following:
The
ACARS
button brings up this display where you can request a weather report.
Your official origin and destination are preset and the weather can be
brought up at the click of a single arrow button. If you want the
weather for an alternate landing site you can enter the ICAO code of
the airport using the letter and number buttons and click the arrow
button next to REQ WX RPT. The weather report is in the
form of a METAR. A typical metar looks like the following:
061853Z 30016G23KT 10SM SCT023 SCT070 26/19 A2989 RMK AO2
061853Z – Time of report, the 6th at 18:53 Zulu.
30016G23KT – Winds to the NW at 300 degrees at 16 knots gusting to 23 knots. Most reports don’t have the gusts and some times you may see vrb for variable. This is the one part I use the most when at an uncontrolled airport. You need to know which runway to use to take off or land into the wind. For this instance I would select the runway closest to a runway 30.
10SM – Ten statute miles visibility. This can be useless if OVC005 because you would have to get down below 500 ft to see 10 miles.
SCT023 – Scattered clouds at 2300 ft. There may be several cloud layers mentioned like here. Clouds can also be BKN (Broken) OVC (Overcast) FEW (Few) SKC or CLR (clear). CLR is reported by an automated system and is clear below 12,000ft. SKC is reported on a manual report.
26/19 – Temperature 26 Celsius Dew point 19 Celsius
A2989 – Altimeter 29.89
RMK – Remarks. Some more common ones are Sea Level Pressure SLP in hectopascals, automated system can’t (A01) or can (A02) discriminate the type of precipitation.
Conclusion
Squawkbox is more than just a program to connect your Flight Simulator Multiplayer Session to a network of servers supporting a large group of players. It gives you the tools to load and execute a flight plan. It also gives you the tools to determine the conditions of the environment you are flying in. It gives you tools to modify your current flight plan or depart from your flight plan as requested by ATC.